Friday, June 29, 2012

Anthro Crochet Earrings

Hi Everyone!

I don't know about you guys, but I LOVE Anthropologie.  I love to look through their items every once in a while...mostly just to see if there is anything that I can try to make for myself.  Anthro is well known in the crafting world for having adorable items, but they are also notorious for their high prices.   

And while I was looking through the jewelry, I saw these


Aren't they cute?!  And hey, just $88.00 and they could be yours! 

Yeah, right. 

Look at how easy these would be to make!  Just a crocheted ball and beads!  I am SO going to have to make some inspired-by earrings!  Can you imagine making some in greens and blues?  So cute!  And am I the only one who completely loves the name?  Crochet Exclamations?!  Pure genius. 

Have a fantastic day!   

Thursday, June 28, 2012

Hiccups

Hi Everyone!

This post is a bit random...

...But, I felt that I should probably warn you all:

Please, NEVER, ever try to paint something while you have hiccups

Especially when it happens to be black, raised fabric paint. 

I think I've said enough ;)

Have an awesome day!


Sunday, June 17, 2012

The Bend and Back

Hi Everyone!

I'm not the only one starting up new blogs....

One of my awesome followers, Kaitlin, has started one that is already proving to be quite lovely! 

After only two posts, I am already enjoying The Bend and Back! :) 

Kaitlin really has a way with words!  And her artwork and photography are brilliant as well.

So hop on by The Bend and Back when you have a chance!

As a side note, if any one you would like me to feature your blog, I'd be more than happy to!  Just let me know! :)

Have a fabulous day!

Friday, June 15, 2012

A New Blog!

Hi Everyone!

I've been thinking about it for a while...and I finally did it.  I made another blog
I always want to talk about the costume/props and everything from Lord of the Rings, but I really don't want to bore my Stitching Up a Storm readers.  So, instead I've made a new blog where I plan to post about everything LOTR!

I'll still be posting here, of course, but I'll just be trying to stick more to actual stitching here.  I promise I won't neglect Stitching Up a Storm! 

After much thought and many sighs of disappointment (at blog names that have already been taken!) I have named my new blog "The World of Woven Trees." 
Pretty, right? :)

Please check it out when you have a chance!  I only have one post up so far, as I am still trying to work out a few kinks in the template, but it should be up and running soon. 
Here is the address:  http://www.theworldofwoventrees.blogspot.com/

Have a lovely day! :)

Tuesday, June 12, 2012

DecoArt Giveaway at Happy Together

Hi Everyone!

I just wanted to give you all a heads up on a great giveaway going on right now at Happy Together.

The prize package is from DecoArt and it is valued at $75!  :)  It includes a ton of different (and really, really cool) craft products. 
You should really check out some of the DecoArt products--they are so neat!  I've been using the metallic paints for a lot of projects lately, and I must say, they are completely awesome!

There are four different ways to enter the giveaway, so go check it out!

Here is a link to the post.  

Have a fabulous day!  :)

Monday, June 11, 2012

Tunisian Crochet

Hi Everyone!

Recently I purchased a TON of crochet hooks from a thrift store--and when I say "a ton"  I mean, like, over 100.  Yeah.  A ton.

Among these many lovely hooks were several Tunisian hooks.  At that point I'd only learned 1 stitch in Tunisian crochet: the basic Tunisian stitch.  As I suddenly had numerous Tunisian hooks, I thought I would try to learn a few more stitches.  A friend of mine had mentioned to me before that I should try out the Honeycomb stitch, so I looked up a quick tutorial and tried it out.  Let me just say, I LOVE that stitch!  It is SO much fun and looks so very cool. 
Interestingly enough, the hooks also came with this really old (but very awesome) booklet on how to do different Tunisian stitches to make a "sampler Afghan"-- 
--As a side note, I've always wondered if anyone actually finishes sampler afghans.  I always get distracted because one of the samples ends up being something I really like crocheting, and then I don't want to bother with the rest of the samples.  Another great example of my lack of patience when it comes to blankets.   

Anyway, I had no idea that Tunisian stitches could really look so much like knit stitches!  It is completely amazing!  There is this one stitch, (that is very un-creatively known as the "knit stitch") that looks EXACTLY like knitting!  And it is so easy!  And so fast!  And really, really fun! 
Oh, and I can do eyelets now, too!  Could it be any more awesome?! 

So now I have yet another obsession.  It is very, very nice to be able to fake knitting--now I don't have to continue being jealous of those beautiful knit stitches.  This is a very. happy. day. 
I'd like to do some tutorials sometime-soon on Tunisian stitches, so you can be expecting those. 
And I've a feeling that Tunisian patterns will be popping up pretty soon as well. 


Have a spectacular day!  (I am starting to run out of ways to tell you guys to have a great day!)

Wednesday, June 6, 2012

Help!!! I need some ideas!

Hi Everyone!

Sorry if the post title is a little over dramatic, but I seriously DO need help with my current project!

As you all know, I love Lord of the Rings.  I also love making replicas of Lord of the Rings things.  And I also love making gifts
So, I am working on a LOTR birthday gift for someone, but I've run into a problem.
I am making Eomer's helmet--here is a pic, found here:


I've finished all of it but one thing--that lovely lock of horse hair up on top.  And to me, it can't really be recognized as being Eomer's helmet at all without the horse hair.
The problem is this--I have NO idea what to use for the hair!  I don't happen to own a horse (or anyone that would be willing to trim their horse's tail for my project!)

I thought that a cheap hair extension would work, and I still think it would--but obviously I underestimated how difficult is would be to find a cheap hair extension... I mean, really, who pays like $130.00 for a hair extension?! 
So, do you guys have ANY ideas for something that would work as faux horse hair?  Or where I can buy a cheap wig/hair extension? 
Any ideas would be greatly appreciated! 

Thanks, have a great day! :)

Tuesday, June 5, 2012

Alley Cat Scratch

Hi Everyone!

I know I mentioned the website Alley Cat Scratch in another post, so I thought I should follow up on it. 

Alley Cat Scratch is a totally awesome costume research website.  The branch of the website that I am most drawn to is the section on Lord of the Rings costumes. 

There is a detailed page on each costume--the construction, fabric used, reference photos, tips on how to make them, ect...  SO much great information!  They also have a HUGE section on making replicas of the costumes and accessories--even ways to fake armor and leather!  They also suggest different patterns you can buy that can be altered to work for certain costumes.  They cover just about everything!

Alley Cat Scratch is really worth checking out!

Have an awesome day! :)

Sunday, June 3, 2012

LOTR Leaf Necklace Tutorial

Hi Everyone!

Woohoo!  I actually got another tutorial up when I said I would! :)

*Please* excuse the really bad quality pictures!  I was taking these while working on the project, and it is not at all easy to take pictures while working on something--not that I am good at taking pictures anyway! ;)

So, to start there are some things you are going to need. 


Materials:

  • Mod Podge Dimensional Magic
  • Thin sheet of clear plastic  (Mine was part of the top of a box I took apart--you may be able to find some from packaging or something.)
  • Craft wire  (The kind that is sometimes used for jewelry--thin enough to bend, thick enough to stay put.)
  • Green Faux Stained Glass Paint 
  • Pic of LOTR leaf  (The one I used can be found here.  You may have to re-size it a bit before printing, but I think it is a pretty good size.)


Step #1:  Hold the plastic sheet on top of the picture and (using the scissors) cut around the main leaf part.  Don't worry about the silver wrapping around for right now, just the leaf.  


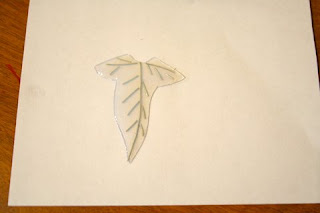
Here is a pic of the plastic and paper side by side.  (If you could actually tell what that was a picture of, you must have really great vision.  Again, I apologize for the picture quality!)


Step #2:  Now you get to bring out the wire.  Cut several pieces of wire to fit on top of the plastic cutout.  It is pretty easy if you use the picture of the leaf as a guide.  Of course, it would be hard to get the wire JUST like it was on the movie pins, so I just go for the same basic idea they had going with these. 


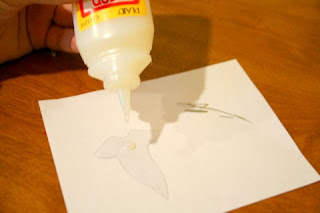
Step #3:  Set the wire aside for a second.  put some Dimensional Magic onto the plastic.  It should be just enough to cover the entire leaf and be raised just a little bit.  As a side note, NEVER EVER shake the bottle of Dimensional Magic!  Then you have to wait about a day to use it.  If it gets stirred up too much it will get little bubbles everywhere when you squirt it out, and they are a real pain to try to get rid of.   


Step #4:  DO NOT wait for the Dimensional Magic to dry!  While it is still wet, VERY carefully set the wire onto it.  You can use tweezers if you like, it may be easier like that.  Once you have the wire where you want it, you can let the leaf dry.  Depending on how much Dimensional Magic you used, the time it takes to dry varies.  I recommend letting it dry overnight--just to be on the safe side. 


Step #5:  Once it is COMPLETELY dry, you can paint it with the faux stained glass paint.  You can do as many coats as you like--it all depends on how dark of a green you would like it to be. 


Step #6:  Now just cut a long piece of the wire and (using another picture of the LOTR leaf as a guide) wrap it around the leaf.  Don't try to do this until the paint has dried though, or you will end up with fingerprints on the leaf. 


And that is it!  These are so fun to make! 
And here is the finished product:


Have a great day!