Showing posts with label tutorial. Show all posts

Saturday, February 2, 2013

{tissue paper flowers: tutorial}

Hullo, friends!
 
Today I was working on wrapping a birthday gift for a friend--which as a side note, I am quite terrible at. 
I can not do any sort of fancy wrapping--not even just plain wrapping--instead it always looks like I got something and just wrapped and taped wherever I liked...which is pretty much what I do--but while 'wrapping' today, I was messing with some little strips of tissue paper I had left and made some little flowery-things.  So I thought I'd make a tutorial to share, just for fun :)
 
 
They're amazing aren't they? :P  Before I even try to go any further with this post, though, let's talk about my nails:


I know. They totally rock. For those who don't know, they are Lord of the Rings nails--see it?! It's the inscription that was on The One Ring! I'll do a tutorial on that sometime :)

 
Ok, back to flowers. 

 
1.  First up, you need a strip of tissue paper--it can be as long or short as you like. 

 
2.  Crumple up the end into a little ball

 
3.  Now start to loosely twist the tissue paper, crumpling it a bit as well, and wrap it around the ball in a circle

 
4.  Keep twisting

 
5.  Once you run out of tissue paper, fold the end to the back of the flower

 
6.  Put some tape on the back to hold it in place

 
7.  Repeat with all of your scrap tissue paper
 
 
Aren't they cute?!  And it adds a nice touch to my rather crazy wrapping!
 
Much love to you all <3

Friday, December 7, 2012

bead weaving (?) tutorial

Hullo, friends!

Ok, so I put together this little tutorial for you all because I have sooooooo much fun making things using this method :)
I'm not actually sure what you would call this--it is sort of like weaving beads though, so that's what I'll call it.  (Plus, that just sounds way cool...)


First off, the materials! For the sake of your eyes, as well as mine, I decided to use large-ish beads and elastic cord for this tutorial.  You could really use any sort of string or cord, as long as it is able to fit through the beads you choose. The beads are going to need to have fairly large holes--at least, large enough for the string you use to go through twice.  The number of beads will of course differ depending on what you are making and the size of the beads you use.  In the picture you can see a sampling of the pattern it is going to make to give you an idea of how many beads will measure however long. 
And you'll need scissors.  
Ok, that about covers materials.


2.  Bring out the cord (thread, string, elastic, whatever you decided on...) measure out 2 times as long as you want your item to be, add five inches and cut.  If you are really paranoid about not having enough at the end ( like me!) you can add even more!


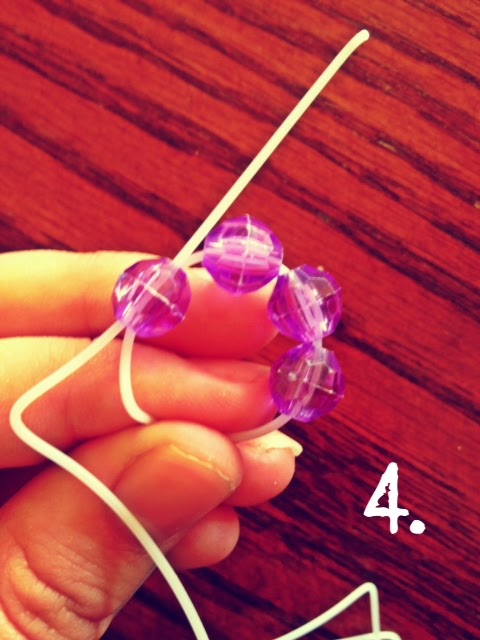
3.  Add 4 beads to the cord and push them over to the middle. 


4.  Ok, this is the "hard" part, even though it's really easy ;)  Just hard to explain.  Hold onto one end of the cord, and hold the bead nearest the end in front of you, the hole horizontal.  Take the opposite side of the cord and stick it through the bead so the two ends are both going through the bead and facing opposite directions.  (And yes, I am fully aware that my fingernails look horrible in this picture.  My apologies about that.)


5.  So picture five is really just me really reiterating step 4.  This is just a different view of that step.  See how the two ends go through that bead? Yep? Were good then, because that is basically the bulk of this tutorial. 


6.  Pull the two ends tight, and this is what you get!  Isn't it neat?  Now that you have this little "square" of beads, the rest is as easy as pie. 


7.  Add two beads to one side, and one bead to the other--it doesn't matter which sides you do this to. 


8.  Grab whichever cord you only strong one bead on from the last step.  Now string that end through the closest of the two beads that you strung on the other end.  The picture explains it better.


9.  Pull both ends again.  See where this is going? :)


10.  Continue the pattern (steps 7 - 9) until it is as long as you'd like.  Now tell me the truth, how awesome does that look?!  (Actually, if you are going to say 'not very', please, don't tell me the truth.  I'd prefer if you just lie.)


11.  When the pattern is at the length you'd like, add one bead to each of the cords.  (To make it clearer in this tutorial I used different colored beads.)


12.  Ok, now this part is pretty difficult to word... Basically you are attaching the two ends.  Just slip one of the cords through the bead from the first "square" that lines up correctly.  Now just tie the two ends of the cords together--this is the last step.  You can add a dab of glue to the knot to ensure that it stays tied if you feel the need. 


And now your beautiful item is finished!  Isn't it just lovely?  I think it turned out rather nice :)

Let me know if anything was confusing! :)  And if you use this tutorial, I'd love to see what you make!  You can always email me at stitchingupastorm@gmail.com!

Blessings! <3


Sunday, June 3, 2012

LOTR Leaf Necklace Tutorial

Hi Everyone!

Woohoo!  I actually got another tutorial up when I said I would! :)

*Please* excuse the really bad quality pictures!  I was taking these while working on the project, and it is not at all easy to take pictures while working on something--not that I am good at taking pictures anyway! ;)

So, to start there are some things you are going to need. 


Materials:

  • Mod Podge Dimensional Magic
  • Thin sheet of clear plastic  (Mine was part of the top of a box I took apart--you may be able to find some from packaging or something.)
  • Craft wire  (The kind that is sometimes used for jewelry--thin enough to bend, thick enough to stay put.)
  • Green Faux Stained Glass Paint 
  • Pic of LOTR leaf  (The one I used can be found here.  You may have to re-size it a bit before printing, but I think it is a pretty good size.)


Step #1:  Hold the plastic sheet on top of the picture and (using the scissors) cut around the main leaf part.  Don't worry about the silver wrapping around for right now, just the leaf.  


Here is a pic of the plastic and paper side by side.  (If you could actually tell what that was a picture of, you must have really great vision.  Again, I apologize for the picture quality!)


Step #2:  Now you get to bring out the wire.  Cut several pieces of wire to fit on top of the plastic cutout.  It is pretty easy if you use the picture of the leaf as a guide.  Of course, it would be hard to get the wire JUST like it was on the movie pins, so I just go for the same basic idea they had going with these. 


Step #3:  Set the wire aside for a second.  put some Dimensional Magic onto the plastic.  It should be just enough to cover the entire leaf and be raised just a little bit.  As a side note, NEVER EVER shake the bottle of Dimensional Magic!  Then you have to wait about a day to use it.  If it gets stirred up too much it will get little bubbles everywhere when you squirt it out, and they are a real pain to try to get rid of.   


Step #4:  DO NOT wait for the Dimensional Magic to dry!  While it is still wet, VERY carefully set the wire onto it.  You can use tweezers if you like, it may be easier like that.  Once you have the wire where you want it, you can let the leaf dry.  Depending on how much Dimensional Magic you used, the time it takes to dry varies.  I recommend letting it dry overnight--just to be on the safe side. 


Step #5:  Once it is COMPLETELY dry, you can paint it with the faux stained glass paint.  You can do as many coats as you like--it all depends on how dark of a green you would like it to be. 


Step #6:  Now just cut a long piece of the wire and (using another picture of the LOTR leaf as a guide) wrap it around the leaf.  Don't try to do this until the paint has dried though, or you will end up with fingerprints on the leaf. 


And that is it!  These are so fun to make! 
And here is the finished product:


Have a great day!

Tuesday, November 22, 2011

Sock Doll Tutorial: Part 1

Hi Everyone!

Is it really possible--- two posts in one day???  Your eyes do not deceive you, my friend!

I finally got around to finishing the first tutorial for the sock doll on dying the socks.  Enjoy! 


                       The 4 small pieces to the left are the tops of the 2 socks in the middle, each cut in half.
                                 The piece to the far right is the top off a longer sock I had.
                              You will only need to dye the 4 small pieces and one of the socks. 
                                                            I hope this is making sense!   

                         
     The only other supplies you will need are: a plastic tub half full (or half empty?) of water, a plastic spoon, and some brown paint (I used one of the small containers you can get at Home Depot.) 


I am sure no one else would make this mistake, but just in case---- ALWAYS make sure to close the lid to you paint all the way!   If you don't, you may end up with this...


Moving on. 


Get a spoonful of paint and mix it into the the water. 


                              Next, dip the socks in the water several times, squeezing them after each dip.

                                  Now just let the socks dry!  The same method works for yarn as well. 

                                    I'll be working on part 2 soon!

Have a great day!