
Ok, so I put together this little tutorial for you all because I have sooooooo much fun making things using this method :)
I'm not actually sure what you would call this--it is sort of like weaving beads though, so that's what I'll call it. (Plus, that just sounds way cool...)

First off, the materials! For the sake of your eyes, as well as mine, I decided to use large-ish beads and elastic cord for this tutorial. You could really use any sort of string or cord, as long as it is able to fit through the beads you choose. The beads are going to need to have fairly large holes--at least, large enough for the string you use to go through twice. The number of beads will of course differ depending on what you are making and the size of the beads you use. In the picture you can see a sampling of the pattern it is going to make to give you an idea of how many beads will measure however long.
And you'll need scissors.
Ok, that about covers materials.

2. Bring out the cord (thread, string, elastic, whatever you decided on...) measure out 2 times as long as you want your item to be, add five inches and cut. If you are really paranoid about not having enough at the end ( like me!) you can add even more!

3. Add 4 beads to the cord and push them over to the middle.
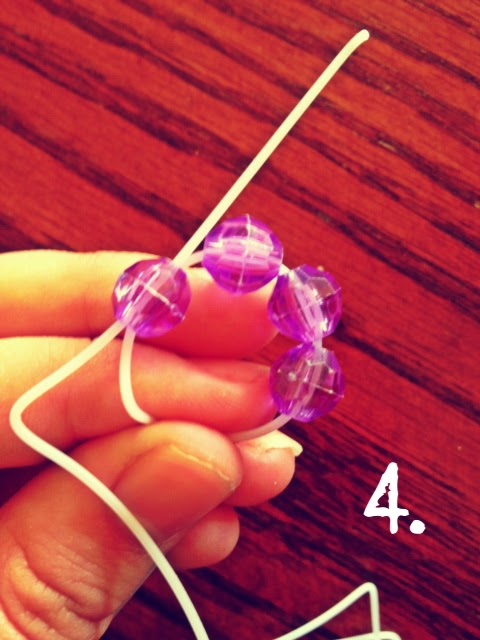
4. Ok, this is the "hard" part, even though it's really easy ;) Just hard to explain. Hold onto one end of the cord, and hold the bead nearest the end in front of you, the hole horizontal. Take the opposite side of the cord and stick it through the bead so the two ends are both going through the bead and facing opposite directions. (And yes, I am fully aware that my fingernails look horrible in this picture. My apologies about that.)

5. So picture five is really just me really reiterating step 4. This is just a different view of that step. See how the two ends go through that bead? Yep? Were good then, because that is basically the bulk of this tutorial.

6. Pull the two ends tight, and this is what you get! Isn't it neat? Now that you have this little "square" of beads, the rest is as easy as pie.

7. Add two beads to one side, and one bead to the other--it doesn't matter which sides you do this to.

8. Grab whichever cord you only strong one bead on from the last step. Now string that end through the closest of the two beads that you strung on the other end. The picture explains it better.

9. Pull both ends again. See where this is going? :)

10. Continue the pattern (steps 7 - 9) until it is as long as you'd like. Now tell me the truth, how awesome does that look?! (Actually, if you are going to say 'not very', please, don't tell me the truth. I'd prefer if you just lie.)

11. When the pattern is at the length you'd like, add one bead to each of the cords. (To make it clearer in this tutorial I used different colored beads.)

12. Ok, now this part is pretty difficult to word... Basically you are attaching the two ends. Just slip one of the cords through the bead from the first "square" that lines up correctly. Now just tie the two ends of the cords together--this is the last step. You can add a dab of glue to the knot to ensure that it stays tied if you feel the need.

And now your beautiful item is finished! Isn't it just lovely? I think it turned out rather nice :)
Let me know if anything was confusing! :) And if you use this tutorial, I'd love to see what you make! You can always email me at stitchingupastorm@gmail.com!
Blessings! <3


