Hullo, friends!
So, here's yet another trend I am finally catching onto...
I love mismatched things. Really, I just love things that completely break the rules of style--who says polka dots and stripes don't work together? They throw each other off perfectly! Who says "old" is bad? Label it "vintage" and it'll sell like hotcakes.
The mismatching rule, however, is by far my favorite. I just love how stylishly quirky it looks!
It had definitely been a widespread trend. Pretty much everything that has ever been matched has also been mismatched.
But for me, earrings take the cake. I am a firm believer that accessories make an outfit. You can have an incredible top, but if you don't style it with the right accessories the awesomeness of the top won't show. Below is a lovely example of mismatched earrings.
Beautiful, right?! Other than the obvious coolness, there is another plus to this trend: think of all the earring options I have now! Will totally save some money off of this! ;)
Pic found here: http://4.bp.blogspot.com/-q-jsjq1a9Eg/Tqo8EnEeQ6I/AAAAAAAAAVc/XUeQu8v9omg/s1600/_DSC0381.JPG
Blessings! <3
Showing posts with label jewelry. Show all posts
Showing posts with label jewelry. Show all posts
Thursday, November 15, 2012
Sunday, September 30, 2012
Hello, Fall
Hi Everyone!
Fall has arrived! And I'm actually enjoying it quite a bit--it is nice and cool outside.
I have always wanted to make some of those pretty little nest necklaces--so a couple of weeks ago, I finally found the time and made a few. I suppose bird nests are really more of a spring-y thing, but I think they will still be nice for fall as well.
This one is probably my favorite:
I love how the pearly beads look with the wire :)
They are super easy and fun to make--you just string 3 beads onto some wire and twist it around into a little nest! They have such a sweet and simple look.
While I was messing around with jewelry, I decided to make a decorative holder for my earrings.
I really, really like it! I just took an old brown, wooden frame, went over it with a white paint marker (leaving bits of the brown to keep the weathered look) and coated it with an acrylic spray. I got rid of the back of the frame and cut out some cork board the same size. I cut 3 pieces of lace ribbon that I hot-glued to the cork board. I hot-glued the cork board into the frame, used the paint marker to doodle a quick heart in the corner, and I was done! I love the brown lace--It works wonderfully for this project because you can loop the earrings through all the little holes in it.
I hope you all have a lovely week! <3
Fall has arrived! And I'm actually enjoying it quite a bit--it is nice and cool outside.
I have always wanted to make some of those pretty little nest necklaces--so a couple of weeks ago, I finally found the time and made a few. I suppose bird nests are really more of a spring-y thing, but I think they will still be nice for fall as well.
This one is probably my favorite:
They are super easy and fun to make--you just string 3 beads onto some wire and twist it around into a little nest! They have such a sweet and simple look.
While I was messing around with jewelry, I decided to make a decorative holder for my earrings.
 |
| Isn't it pretty?! |
Sunday, June 3, 2012
LOTR Leaf Necklace Tutorial
Hi Everyone!
Woohoo! I actually got another tutorial up when I said I would! :)
*Please* excuse the really bad quality pictures! I was taking these while working on the project, and it is not at all easy to take pictures while working on something--not that I am good at taking pictures anyway! ;)
So, to start there are some things you are going to need.
Materials:
Step #6: Now just cut a long piece of the wire and (using another picture of the LOTR leaf as a guide) wrap it around the leaf. Don't try to do this until the paint has dried though, or you will end up with fingerprints on the leaf.
And that is it! These are so fun to make!
And here is the finished product:
Have a great day!
Woohoo! I actually got another tutorial up when I said I would! :)
*Please* excuse the really bad quality pictures! I was taking these while working on the project, and it is not at all easy to take pictures while working on something--not that I am good at taking pictures anyway! ;)
So, to start there are some things you are going to need.
Materials:
- Mod Podge Dimensional Magic
- Thin sheet of clear plastic (Mine was part of the top of a box I took apart--you may be able to find some from packaging or something.)
- Craft wire (The kind that is sometimes used for jewelry--thin enough to bend, thick enough to stay put.)
- Green Faux Stained Glass Paint
- Pic of LOTR leaf (The one I used can be found here. You may have to re-size it a bit before printing, but I think it is a pretty good size.)
Step #1: Hold the plastic sheet on top of the picture and (using the scissors) cut around the main leaf part. Don't worry about the silver wrapping around for right now, just the leaf.
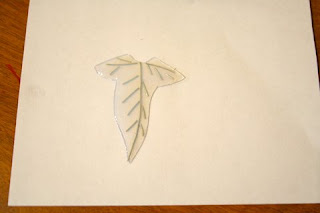
Here is a pic of the plastic and paper side by side. (If you could actually tell what that was a picture of, you must have really great vision. Again, I apologize for the picture quality!)
Step #2: Now you get to bring out the wire. Cut several pieces of wire to fit on top of the plastic cutout. It is pretty easy if you use the picture of the leaf as a guide. Of course, it would be hard to get the wire JUST like it was on the movie pins, so I just go for the same basic idea they had going with these.
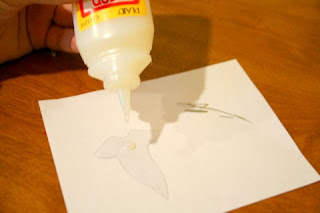
Step #3: Set the wire aside for a second. put some Dimensional Magic onto the plastic. It should be just enough to cover the entire leaf and be raised just a little bit. As a side note, NEVER EVER shake the bottle of Dimensional Magic! Then you have to wait about a day to use it. If it gets stirred up too much it will get little bubbles everywhere when you squirt it out, and they are a real pain to try to get rid of.
Step #4: DO NOT wait for the Dimensional Magic to dry! While it is still wet, VERY carefully set the wire onto it. You can use tweezers if you like, it may be easier like that. Once you have the wire where you want it, you can let the leaf dry. Depending on how much Dimensional Magic you used, the time it takes to dry varies. I recommend letting it dry overnight--just to be on the safe side.
Step #5: Once it is COMPLETELY dry, you can paint it with the faux stained glass paint. You can do as many coats as you like--it all depends on how dark of a green you would like it to be.
Step #6: Now just cut a long piece of the wire and (using another picture of the LOTR leaf as a guide) wrap it around the leaf. Don't try to do this until the paint has dried though, or you will end up with fingerprints on the leaf.
And that is it! These are so fun to make!
And here is the finished product:
Have a great day!
Sunday, February 19, 2012
Beaded Crochet
Hi Everyone!
Have any of you ever tried crocheting with beads? I did recently, and I am really enjoying it!
I used this awesome tutorial from Notes from the Something. You would not believe how easy it is to make crocheted necklaces!
Here is the necklace I made:
I really like how it turned out! Unlike the tutorial, I used a thin wire for my necklace because that was all I had on hand at the time, but I actually really like how it looks with the blue/green beads!
Crocheting with beads is something totally worth trying! So fun!
Have an awesome week!
*Note*-- Stay tuned! The monthly pattern is soon to come!
Subscribe to:
Posts (Atom)


